

Under vSphere 8 you have two possible ‘quests’ when it comes to creating a vSphere Supervisor:
- NSX
- vSphere Distributed Switch (VDS)
In this post, I would like to discuss the scenario with ‘NSX’, more specifically NSX with AVI as a load balancer, as this is possible since NSX 4.1.1.
Eigentlich gibts dafür ja wie immer Anleitungen von Broadcom (Anleitung), aber ehrlich Actually, as always, there are manuals from Broadcom (manual), but to be honest: if you follow these instructions without a clue, you will not have any success with the deployment.
Here is the setup I used to get it to run:
- AVI 30.2.2
- vSphere 8U3e
- NSX 4.2.1.0
Here we go!
Preparation NSX
I don’t want to go into NSX itself, we need an already configured environment, i.e. Overlay, T1, T0 and an Edge Cluster.
However, we also need the following segments for the Supervisor:
- a Dummy Segment (must be specified when creating the NSX Cloud in AVI, but will not be used. If anyone has a cooler idea, feel free to share it with me).
- a Management Segment (for the AVI Service Engines)
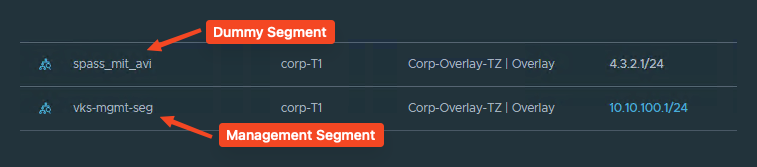
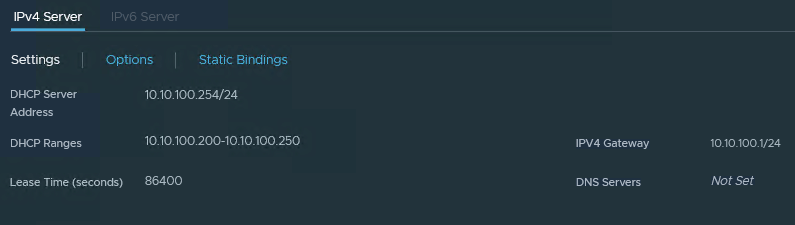
- A DHCP server in the Management Segment (also for the AVI Service Engines)
I have come up with the following subnets for my lab:
| Subnet | Gateway | Purpose? | NSX Segment? |
|---|---|---|---|
| 4.3.2.0/24 | 4.3.2.1 | Dummy for AVI configuration | yes |
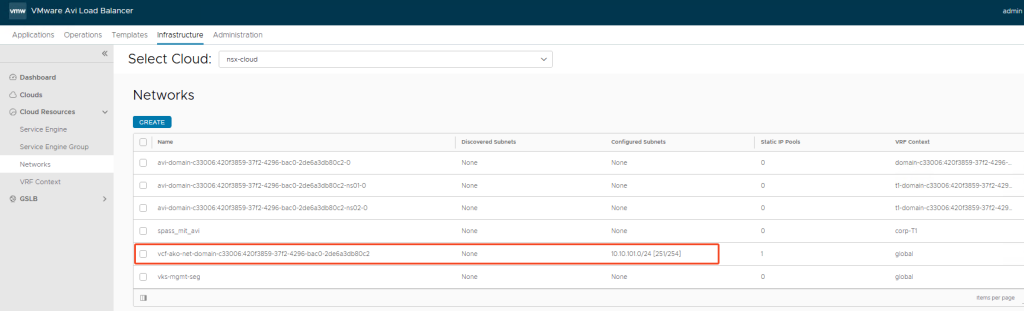
| 10.10.100.0/24 | 10.10.100.1 | Management IPs AVI Service Engines, Supervisor Nodes | yes |
| 10.10.101.0/24 | Ingress network aka Virtual Service IPs in AVI | no | |
| 10.10.102.0/24 | Egress network aka NAT IPs, through which namespaces communicate externally | no | |
| 10.244.0.0/20 | Network range from which Namespaces draw for workloads (further subdivided by another prefix, in my case /28) | no |
Preparation AVI
I assume that an AVI Controller Cluster (or Single Node) is already installed, but this is also relatively easy to do.
AVI is an options monster, I’ll try to briefly summarise the really relevant settings.
Create a new cloud under ‘Infrastructure >> Clouds’:
Leave the General Settings as they are, enter a name, leave all the tick boxes ticked
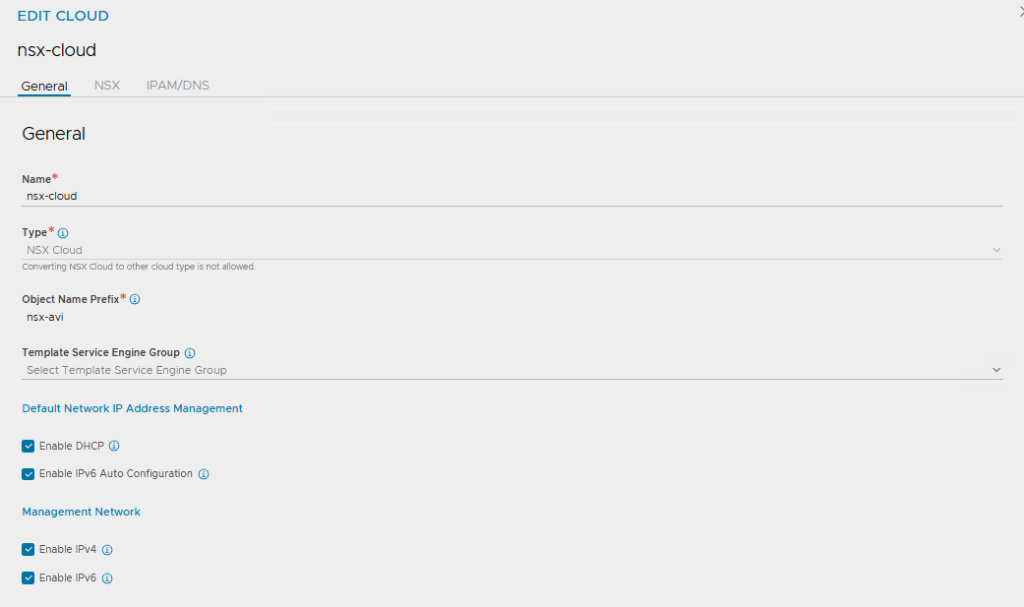
Under ‘NSX’, enter the NSX Manager including login credentials.
For the Management Network, select the appropriate NSX Transport Zone, the T1 and the specially created Management Segment

For the ‘Data Network’, only the overlay transport zone is actually relevant. The T1 and the associated segment must be specified, otherwise the configuration cannot be saved. NSX then fills the segments with its own information.
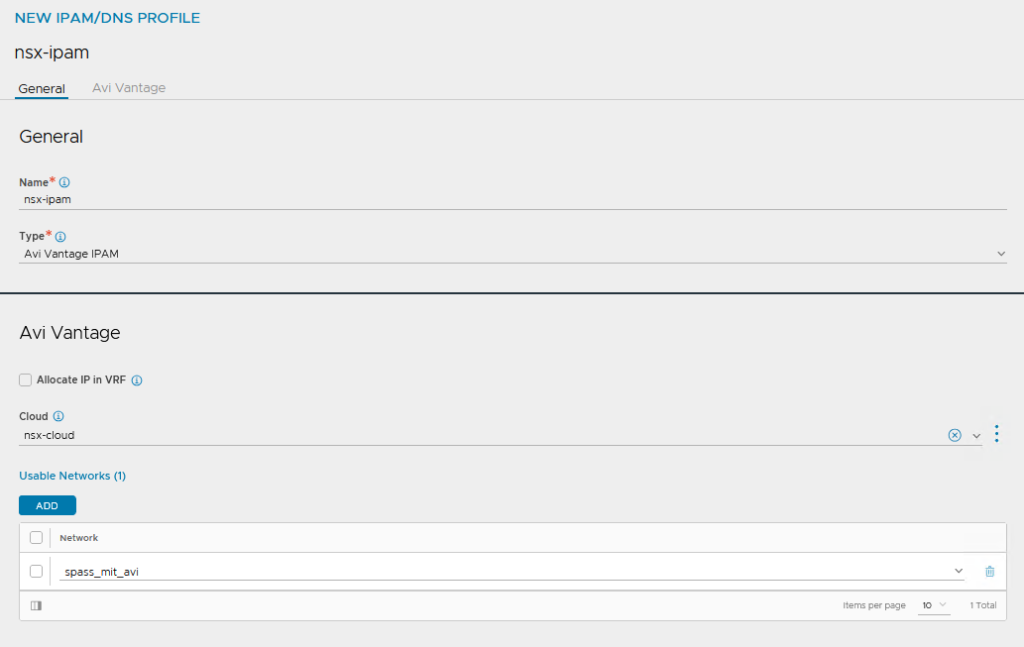
Important here (because it is not in the Broadcom documentation) is the specification of an IPAM profile, otherwise the supervisor will not work.
And then also enter the vCenter, pleasethanks!
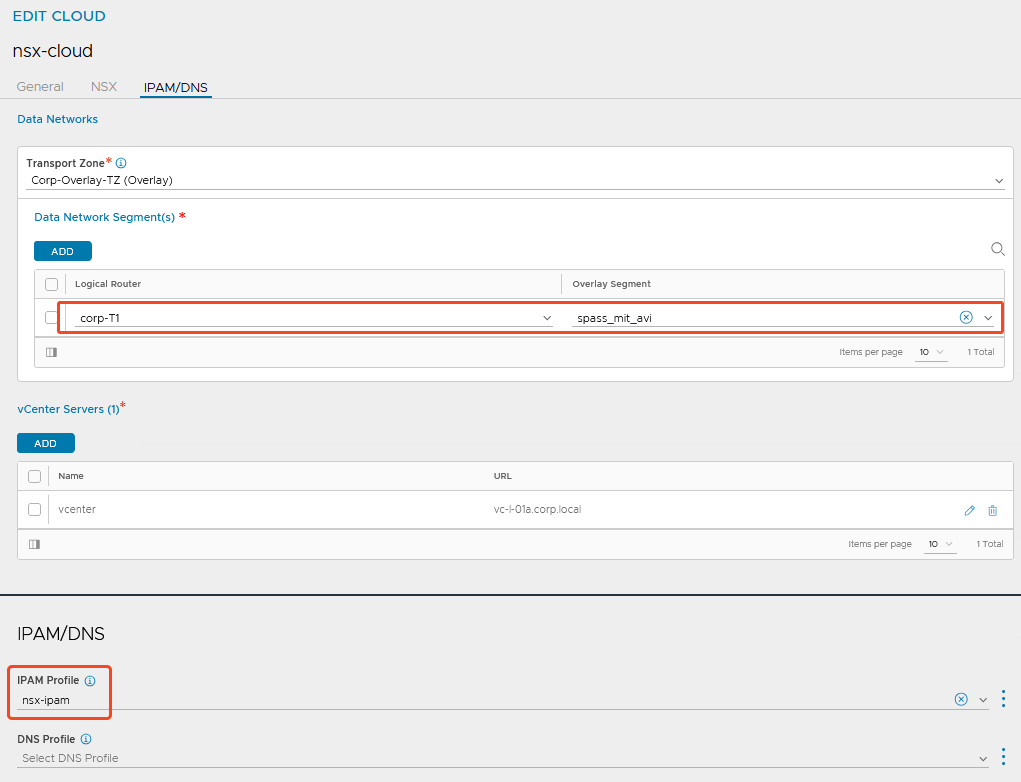
The IPAM profile of the type ‘Avi Vantage IPAM’ with the Dummy Network is sufficient here.
NSX will enter its own segment here later.
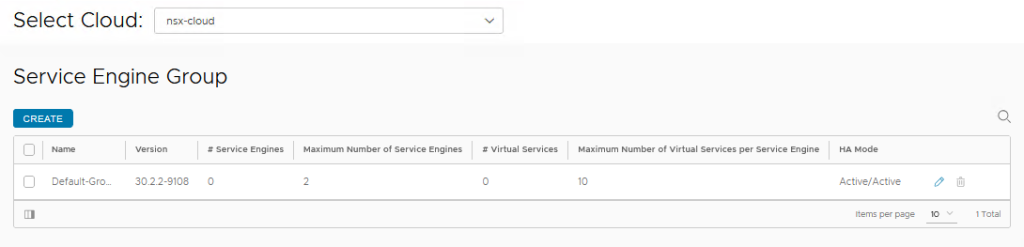
Customize the Default Service Engine Group:
For the NSX Cloud, I then customised my Default Service Engine Group to my ‘needs’, everyone can do as they wish.
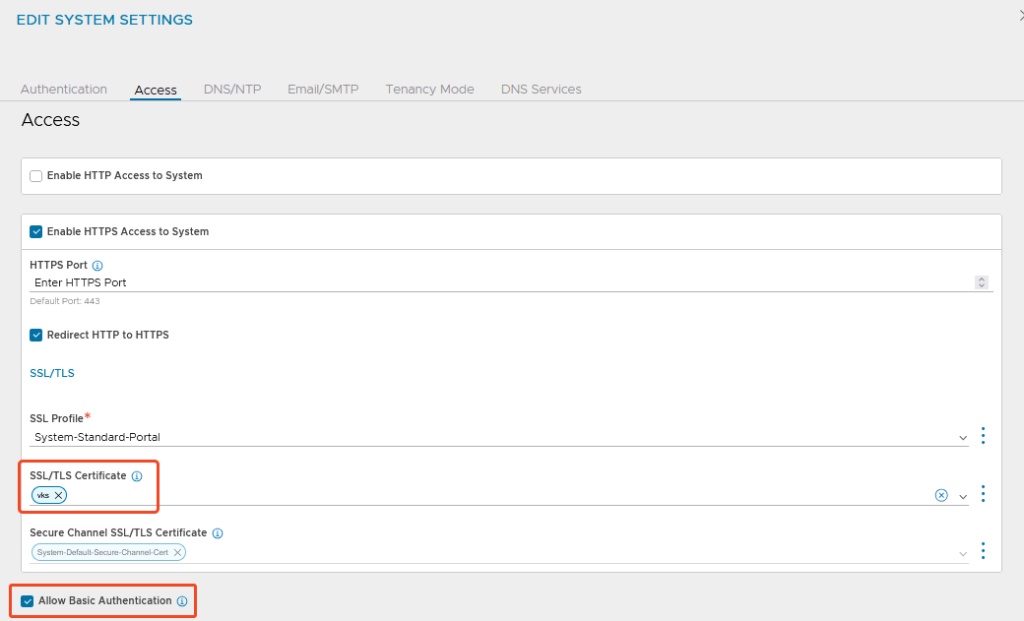
Change the Certificate:
I also created my own self-signed certificate for the controllers and replaced it for the web interface.
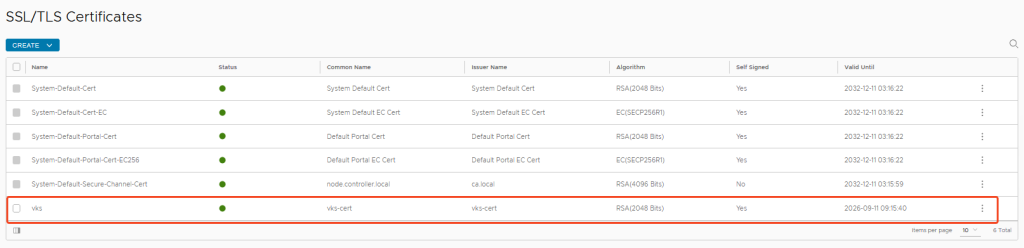
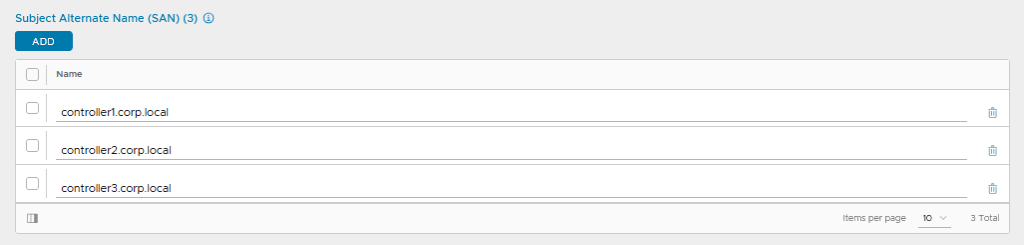
When creating the certificate, make sure that all relevant Subject Alternative Names are included (I prefer to include more than necessary before I end up missing something):
Registering AVI with NSX
And now comes a nasty step, for which I hope for improvement in ‘Future Releases’: The AVI controller (cluster) must be made known in NSX via API call (wtf?!)
The API call looks like this (with the appropriate places adjusted to your own environment):
curl -k --location --request PUT 'https://<NSX Manager>/policy/api/v1/infra/alb-onboarding-workflow' \
--header 'X-Allow-Overwrite: True' \
--header 'Authorization: Basic <Base64 Encoded user:password Combination of NSX User>' \
--header 'Content-Type: application/json' \
--data-raw '{
"owned_by": "LCM",
"cluster_ip": "<AVI Controller Cluster IP>",
"infra_admin_username" : "admin",
"infra_admin_password" : "MySuperSecretSecret"
}'
Code language: PHP (php)Tip:
If no Linux VM with the appropriate tools was available, I used the existing vCenter and encoded my NSX user here and sent the API call. All the necessary tools are available there.
#Base64 Encoding
echo -n 'user:password' | openssl base64Code language: PHP (php)
And then check if the settings fit:
curl -k -u 'user:password' --location --request GET https://<NSX Manager>/policy/api/v1/infra/sites/default/enforcement-points/alb-endpointCode language: JavaScript (javascript)Here the status should be “DEACTIVATE_PROVIDER“:
{
"connection_info" : {
"username" : "\u0000\u0000\u0000\u0000\u0000\u0000\u0000\u0000",
"tenant" : "admin",
"expires_at" : "2025-05-12T16:00:09.865508+00:00",
"managed_by" : "LCM",
"status" : "DEACTIVATE_PROVIDER",
"certificate" : "...",
"is_default_cert" : true,
"enforcement_point_address" : "<AVI Controller Cluster IP>",
"resource_type" : "AviConnectionInfo"
...
}
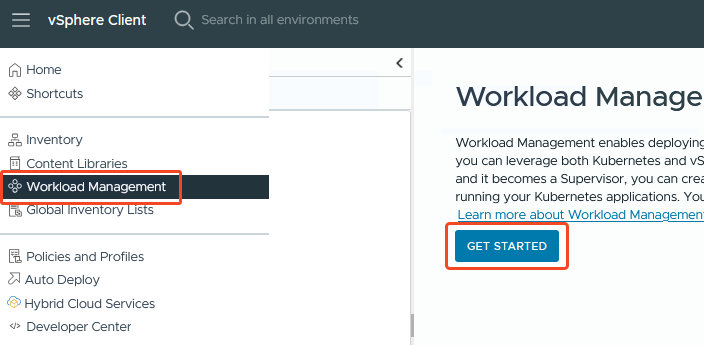
Code language: JSON / JSON with Comments (json)vSphere Supervisor Installation
The preparations are done, so let’s go to the Workload Management of our vCenter and firmly click on ‘Get Started’.
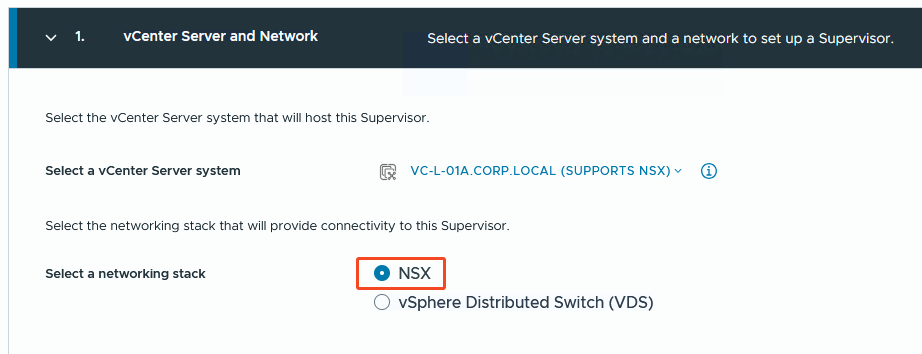
Step 1:
I go for the NSX quest.
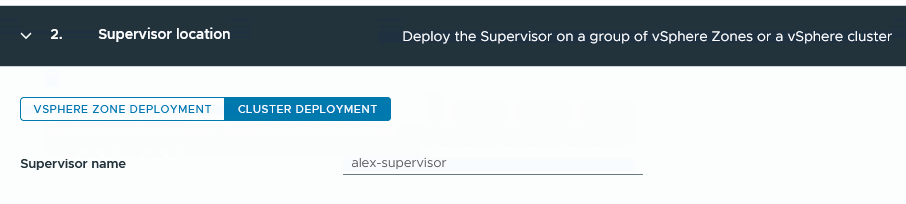
Step 2:
I want it to be a Cluster Deployment (unfortunately I don’t have enough clusters for the Zone Deployment 🥲 )
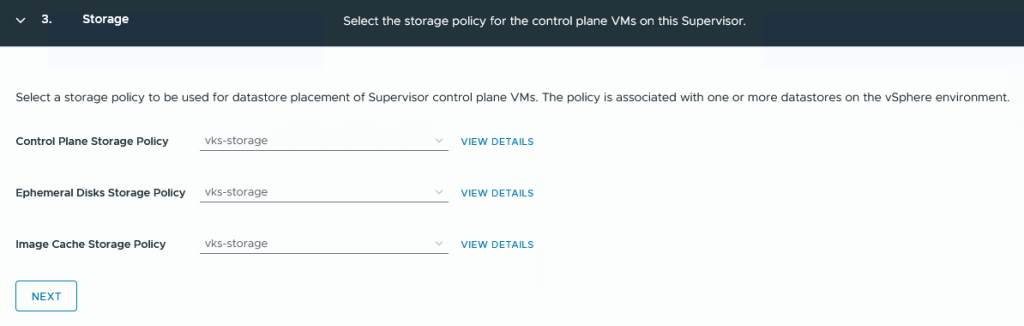
Step 3:
The selection of Storage Policies. For my lab, I created a Standard VSAN Policy called ‘vks-storage’ without much fuss.
The Ephemeral Disks Policy refers to vSphere PODs (nobody uses them anyway) and I don’t even know what is meant by the Image Cache Policy.
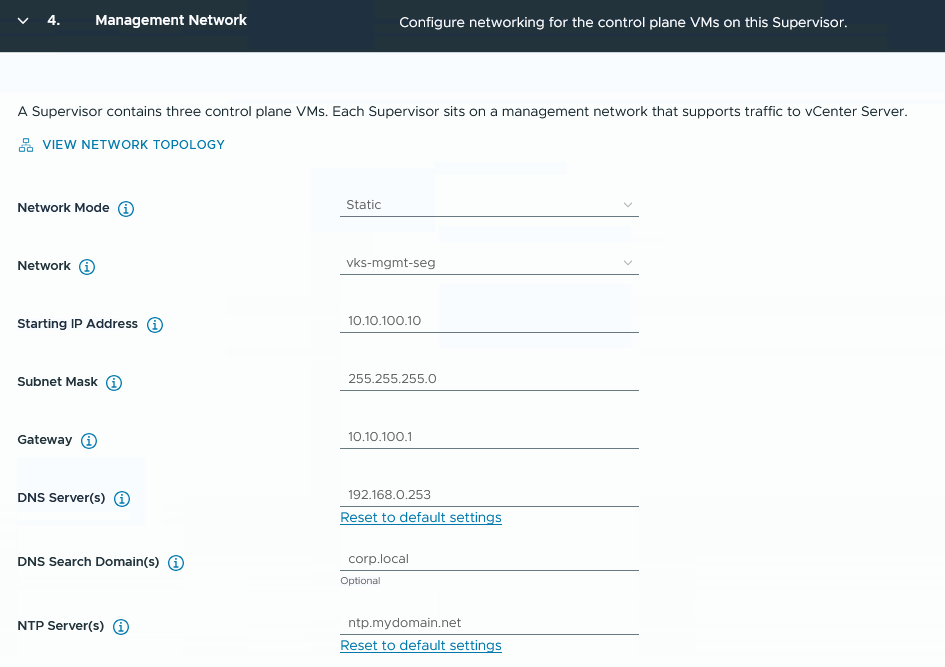
Step 4:
For the Management Network, I decide in favour of the previously created NSX segment ‘vks-mgmt-seg’.
The start IP for the supervisor VMs must be entered, 5 consecutive IPs are used (3 for the VMs, one for ‘rolling updates’ and one as a reserve in case one of the VMs fails and needs to be redeployed)
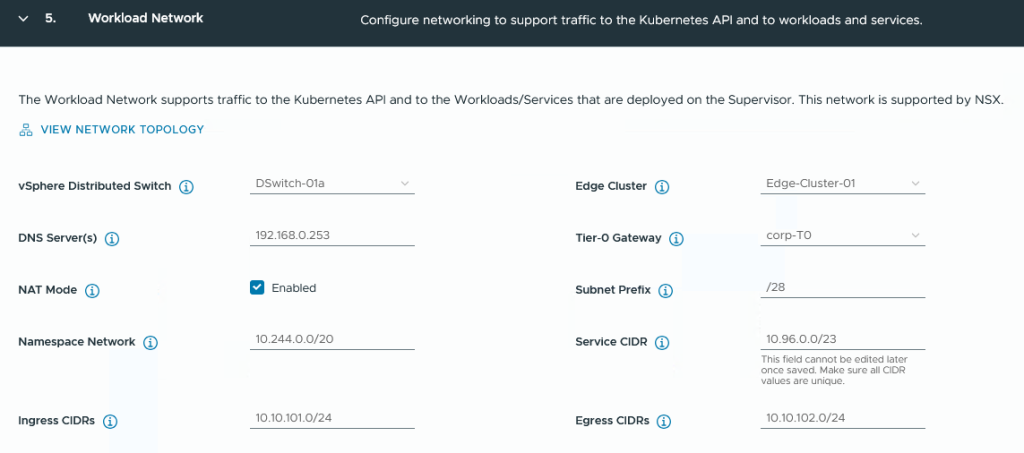
Step 5:
For the Workload Network, you now select the Distributed Switch used by NSX, the desired Edge Cluster and the T0 Gateway.
For the Namespace Network, you specify the IP pool from which all workloads (per Namespace and Kubernetes Cluster) are to be served. To define the size of a ‘pool’, the ‘Subnet Prefix’ is used as a limitation (example below)
The Ingress CIDR defines the subnet for the public load balancer IPs that AVI can use.
The Egress CIDR serves as NAT subnet for namespace services, each Namespace is assigned a NAT address.
Example Namespace IP Usage:
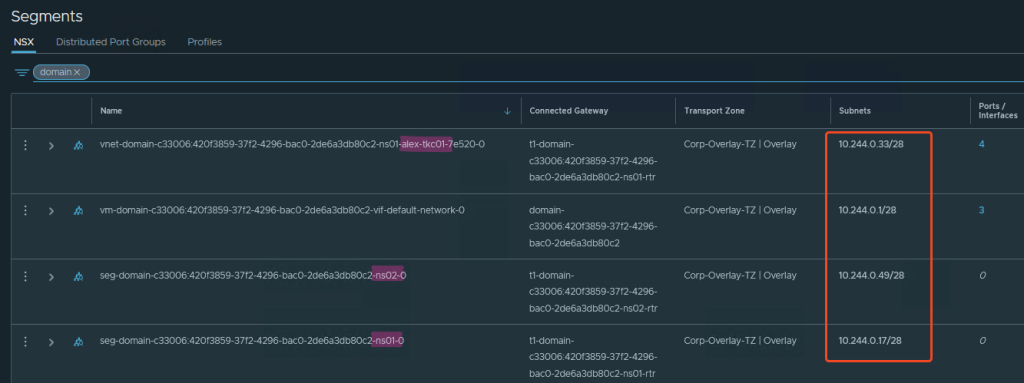
If I create a Namespace, it gets a /28 network from the Namespace Network according to my settings.
As you can see in the screenshot, NSX now creates segments from this. I created the Namespace ns01 first, then a Tanzu Kubernetes Cluster (TKC) alex-tkc01, then a Namespace ns02.
In my case, each of these components is assigned a subnet with 14 usable addresses (/28).
This should be taken into account during sizing, as my Workload k8s clusters can now have a maximum of 14 nodes or if I want to create vSphere Pods (😵💫?!), this also ends after 14 units.
However, there is no such limitation within the TKC; what counts here is what I specify in my YAML as the ServiceCIDR for the Kubernetes cluster.
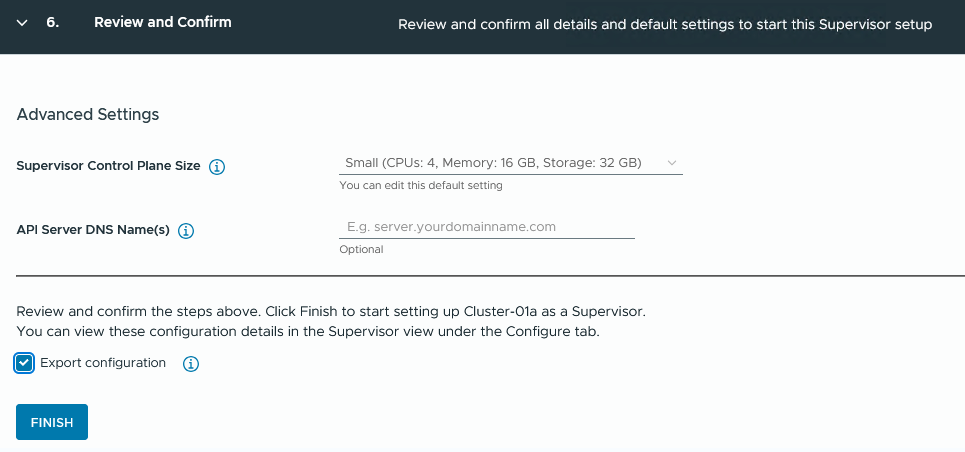
Step 6:
I then quickly determined the size of my Supervisor Nodes; I would choose at least medium for production environments.
Remember: ‘Once you go big, there’s no going back.’
And I’d also like ‘Export configuration’, then it’s quicker if you need to roll out the Supervisor again (it’s also good documentation).
And the engine starts rolling…
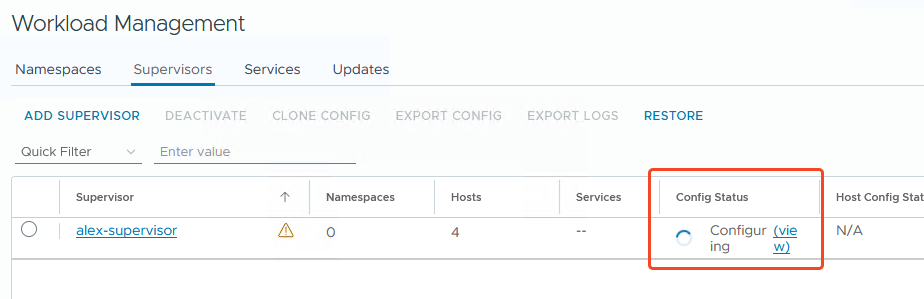
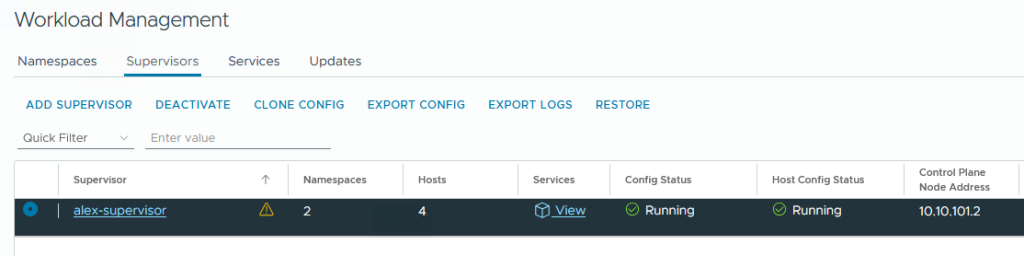
…and is done after a few minutes (depending on network, storage etc.) 🥳
Ready to deploy some Workloads!
What’s going on behind the scenes?
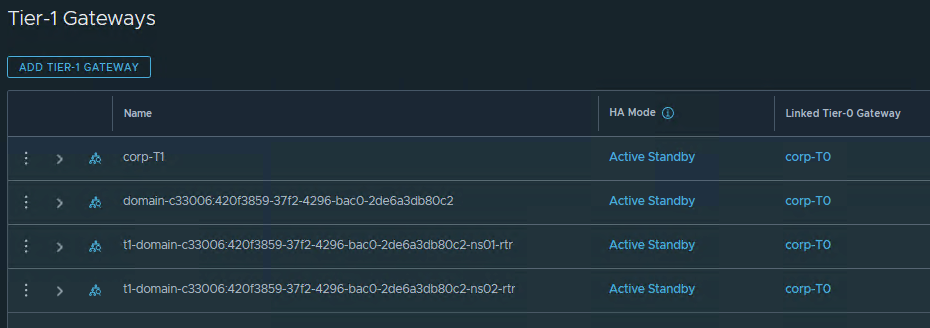
In the background, the wizard has now assembled the necessary T1, segments, load balancer Virtual Service, Pools, NAT rules and whatever else is required.
The nice thing about this configuration is that in future NSX will take care of creating the Workload Networks, the load balancers in AVI, the routing, etc. and manual creation for Workload Networks, Distributed Port Groups, etc. will no longer be necessary and therefore the networking will also take place ‘within’ my virtual environment.
Here are just a few examples:
Automatically created T1 and Segments in NSX:

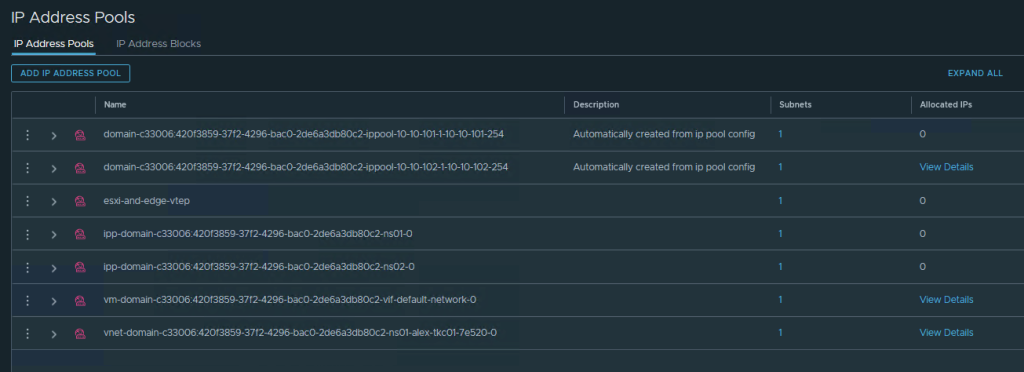
The IPs for this are provided from IP Address Pools:
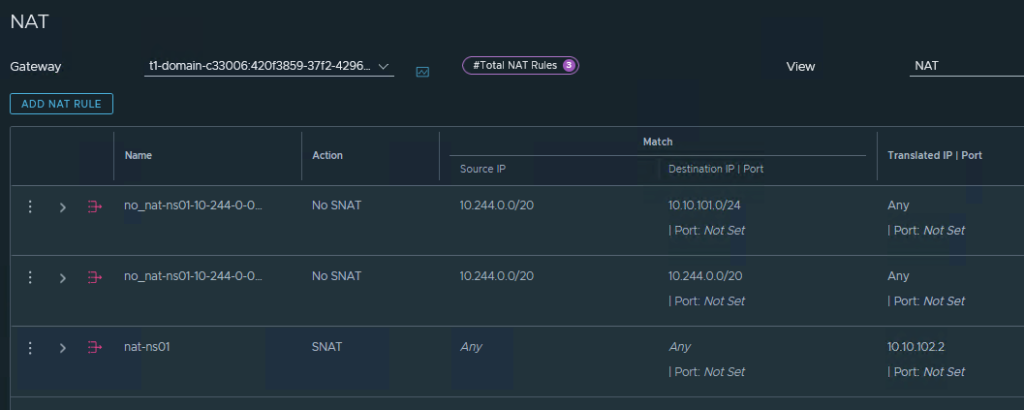
NAT rules in NSX for Namespaces:
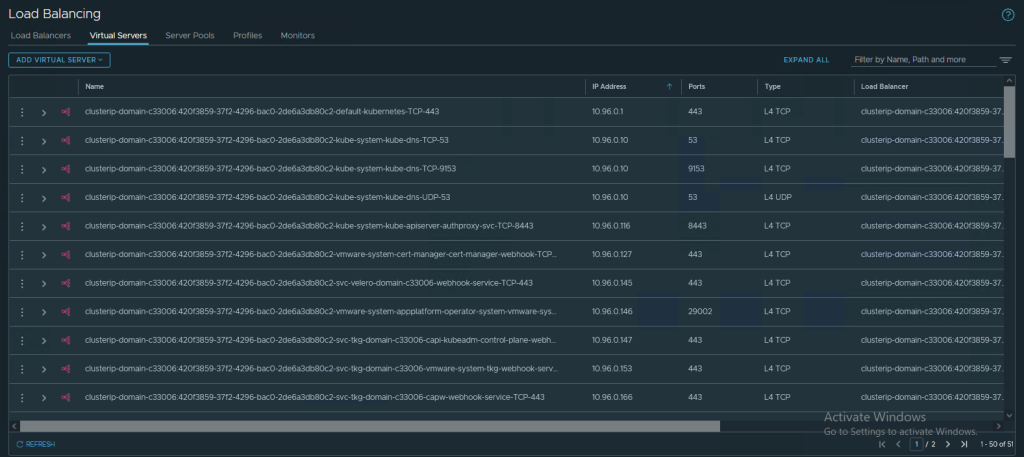
And if you think that load balancing now happens via AVI or k8s internal ways, however the Supervisor itself provides its cluster IPs via NSX Native Loadbalancer:
Virtual Services incl. Pool in AVI:
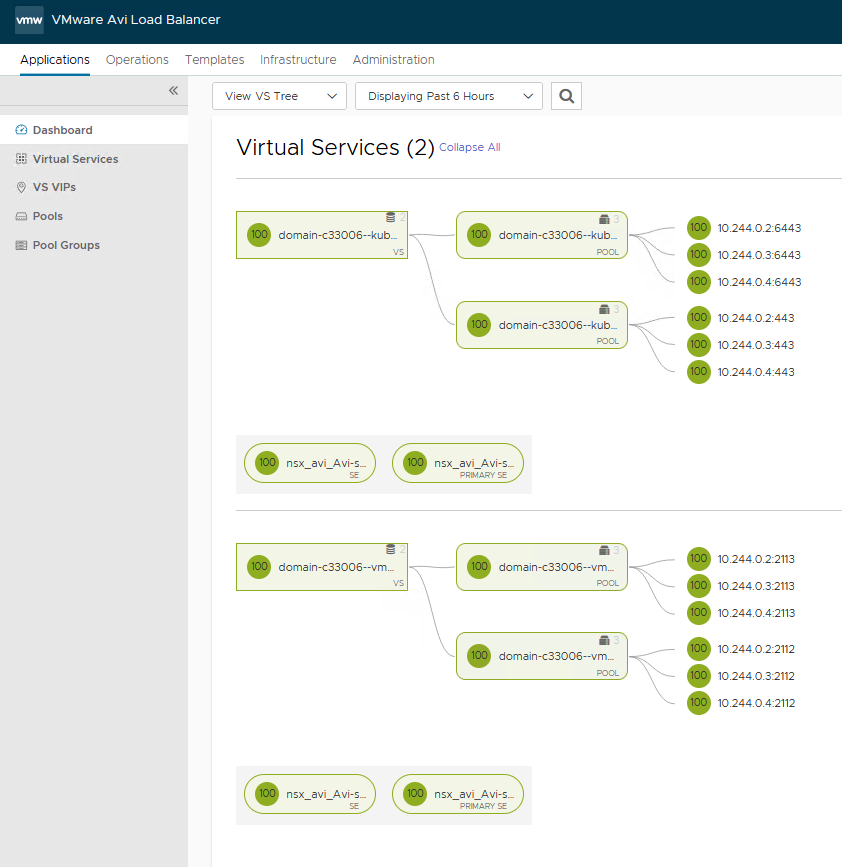
And AVI also gets its own Network Pool, from which the Virtual Service IPs are obtained:
NSX Administration
The NSX admin now probably thinks: ‘Cool, now I can work with the distributed firewall at container level!’
Unfortunately, this is not the case for the time being. The Supervisor creates some services and groups, even a container cluster, but there is no view into the internal structure of the Namespaces. The set of rules is therefore limited to VM, segment and service level outside Kubernetes.
Next Step: Antrea Integration
The network traffic inside the Tanzu Kubernetes Cluster is managed by Antrea.
There is the possibility of integration in NSX, which will be the topic of a subsequent blog post.